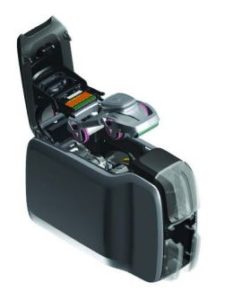
The 800300-350EM YMCKO ribbon can print up to 200 cards and is popular for users of the Zebra ZC100 and Zebra ZC300.
Below, you’ll find step-by-step instructions for changing it, although the same process applies to the vast majority of printer ribbons used in the ZC printer range.
Step 1 – Open the top cover
Open the top cover of the Zebra ZC300 using the handle.
Step 2 – Remove the old ribbon
Remove the old ribbon from the printer. You should be able to easily lift it out of position.
Remember it’s important that you dispose of your printer ribbons properly because they can often contain sensitive data that have been printed onto cards.
Step 3 – Remove the cleaning roller protector
Once removed from its packaging, remove the paper protector from the cleaning roller on the new ribbon. Now remove any slack in the ribbon by winding the spools
Step 4 – Insert the new ribbon

Now simply insert the new ribbon into position in the direction shown in the picture below. It should easily fall into place without any resistance.
Step 5 – Close the top cover
To finish the process, close the printer’s top cover until it clicks shut.
Need more help?
Zebra has designed its printers to ensure ribbon changing is made as easy as possible, so you shouldn’t run into too many problems. However, if you need troubleshooting advice, our technical support team can help.


